If you’re reading this article, you probably already know how to map hardware controllers to basic functions in MainStage. Now it’s time to take it one step further and map controllers to control effects plugins.
Check out the video below.
There are quite a few things going on in this video, but focus on the Direction Mixer, which controls a sound’s stereo width. In this situation, I used it to reduce the stereo width. To accomplish this, I mapped a virtual controller to move from 127 to 0, over a designated number of beats. In this case, 127 represented 2.00 spread and 0 represented 0 spread.
A virtual controller script was used in the above example, but it’s obviously possible to control effects with a hardware controller as well. In most cases, you’ll want effects to change or evolve over time, so you’ll need to use a continuous controller — an expression pedal or mod wheel.
Something like this is best taught by example, so here’s a situation where I’ve had to map controllers to effects in the past.
I worked on an Off-Broadway show called Invisible Thread last year. It was by far the most intensive show I’ve ever programmed for. Tom Xi and I had to write a lot of custom JS code to manipulate MIDI, and there was also a lot of room for creative sound design.
One of the songs called for a “vanishing piano,”
How do you interpret something like that?
If you want to be uncreative, you could simply map the expression pedal to control volume and be done with it. However, that’s boring and you probably shouldn’t be in this business if you don’t want to be creative.
The first task was to decide what hardware controller to use. The mod wheel was out of the question because the keyboardist needed to use both hands. The expression pedal was mapped to control volume. Since this patch involved making a piano sound vanished, I decided it would be fine to override the expression pedal’s default mapping.
Here are the general sound design parameters I came up with.
Moving the pedal from 127 to 0 would do the following…
- Move the piano fader from -6dB to -20dB.
- Increase the stereo spread of the piano sound from 1.00 to 2.00.
- Move an EQ’s high-pass filter from 100Hz to 10kHZ.
- Move a shelving EQ from 0dB to +3dB at 10kHz.
- Increase a pre-fader reverb send from -30dB to -0dB.
Let’s break it down even further.
- I moved the piano fader down to decrease the “dry” signal.
- Increasing the stereo spread created a sense of expansion.
- Gradually raising the HPF created a sense of increasing distance.
- Raising frequencies above 10kHz helped with presence.
- Gradually increasing the reverb signal resulted in atmosphere.
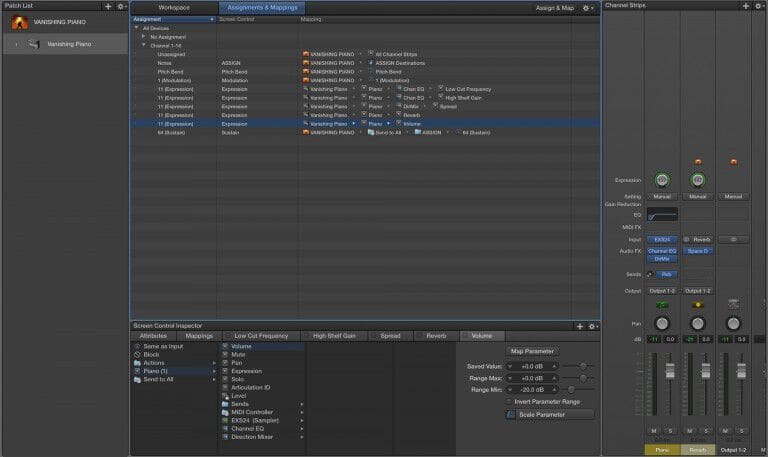
Here’s a channel strip screenshot.
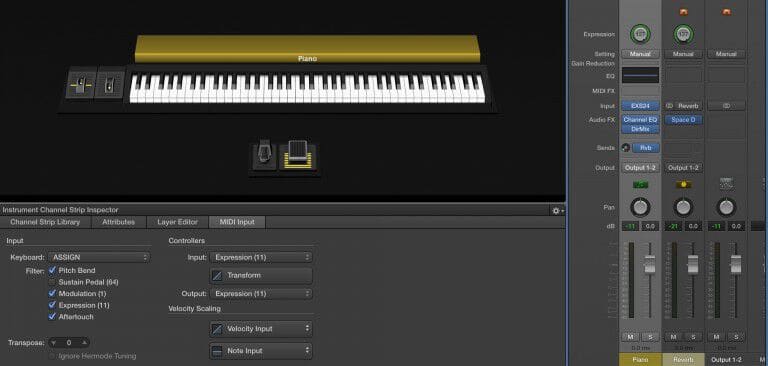
Channel EQ is being used for both EQ operations, Direction Mixer is being used for stereo spread, and Space Designer is on the reverb bus.
First, the default state for all the plugins need to be set.
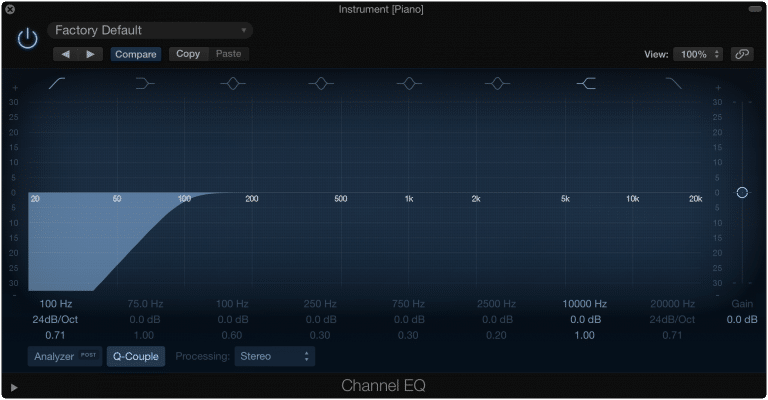
Two parametric EQ bands are needed — high-pass and high-shelf. The default states for the two bands are 100Hz for high-pass and 10kHz for high-shelf. All the other bands can be disabled.
The default state for the Direction Mixer’s stereo spread parameter is 1.00. Feel free to experiment with the other parameters if you’re curious. For the purpose of this tutorial, I’ll only be using the stereo spread function.
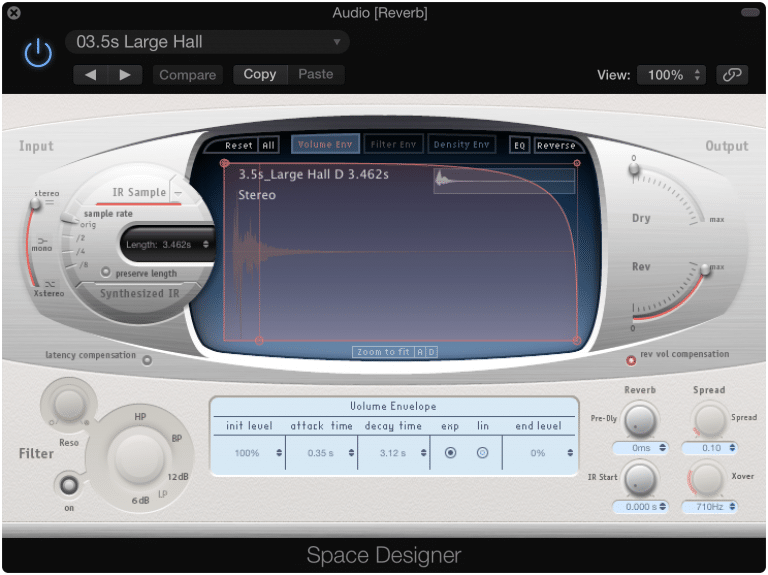
Lastly, the reverb is just a standard large hall Space Designer preset. I don’t recommend using Space Designer in live performance, but it’s fine for this example. Matrix Reverb is a more CPU-friendly option, and sounds decent. The only thing I’ve changed is the Wet setting of the reverb. Make sure that’s at 100% because it’s a bus effect.
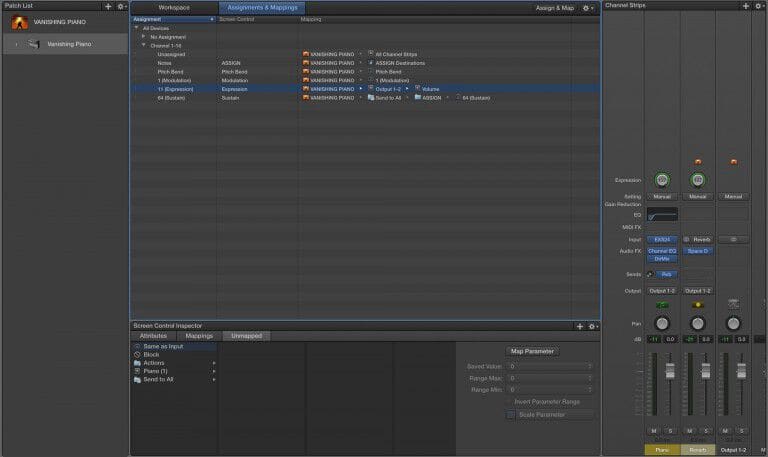
All the actual mapping happens in the Assignments & Mappings window.

As you can see, Output 1 – 2’s volume is currently mapped to the expression pedal. Click on the mapping, and check Override Concert Mapping to disable volume control for this specific patch.
Next, click on Unmapped, and proceed with the first mapping.
Let’s start with the high-pass filter mapping. Select the Piano channel strip followed by the** Channel EQ** plugin parameters.
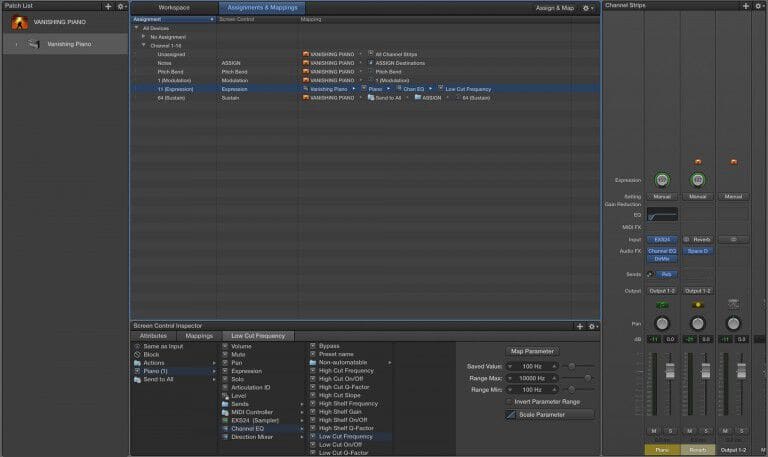
Surprise! There is no option for high-pass filter. Just kidding. A high-pass filter is also referred to as a low-cut filter. Select Low Cut Frequency because that’s what we want to control with the pedal. Set the Range Max to 10,000Hz (10kHz), Range Min to 100Hz, and the** Saved Value (default value)** to 100Hz.
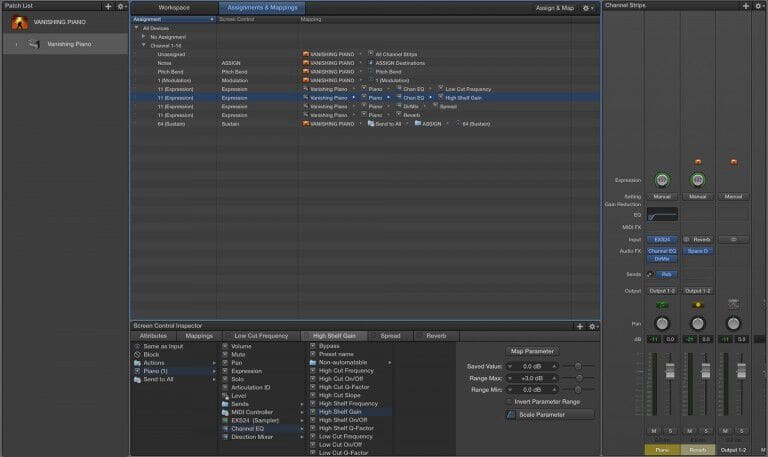
Click on the plus symbol in the upper right hand corner of the Screen Control Inspector to add another mapping. This time, navigate to Channel EQ again, and select High Shelf Gain. We don’t need to mess around with frequency automation this time because all we need to do is move the high-shelf, which we set up earlier, up 3dB. Set the Range Max to +3.0dB, Range Min to 0dB, and the** Saved Value** to 0dB.
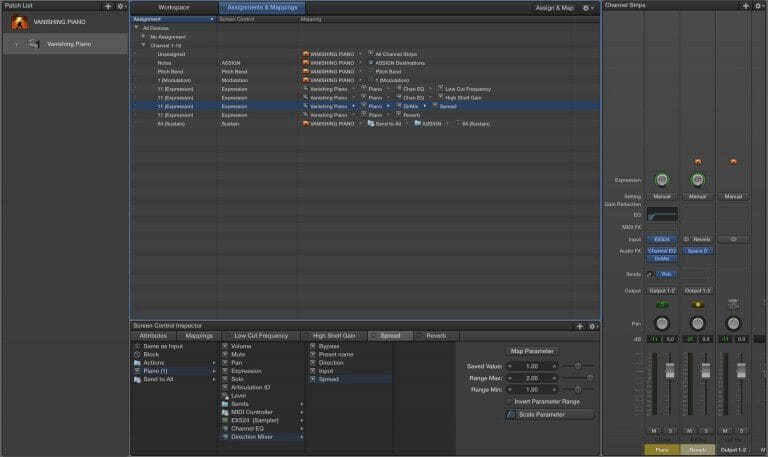
Now, automate the Spread parameter of the** Direction Mixer**.
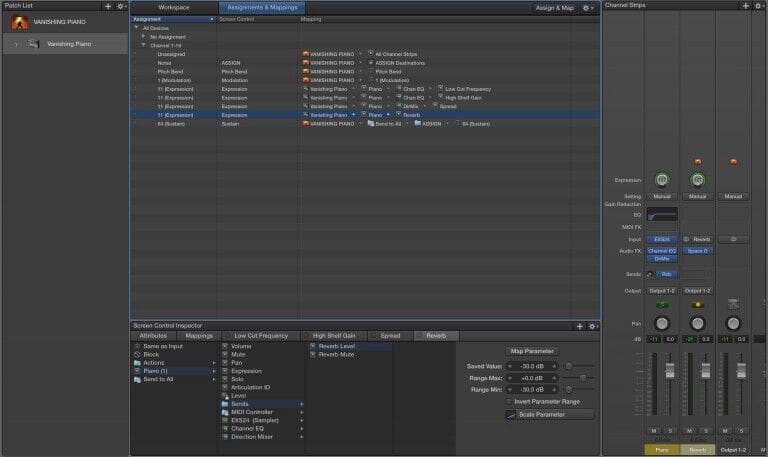
Map the reverb send level. To do this, navigate to Piano/Sends/Reverb Level.
Finally, map the volume decrease from 0dB to -20dB.
Now, move the expression pedal. You should see the mapped parameters move with the pedal. Pretty cool, right?
There’s a slight issue. All the mappings are backwards. Since our default values (unaffected piano sound) correspond to the expression pedal at 127, we’ll have to invert all the parameter mappings. To do this, simply click on Invert Parameter Range for each effect mapping. Keep in mind you may not need to invert the range for all the mappings. Inversion is only required when hardware min/max is opposite from software min/max.
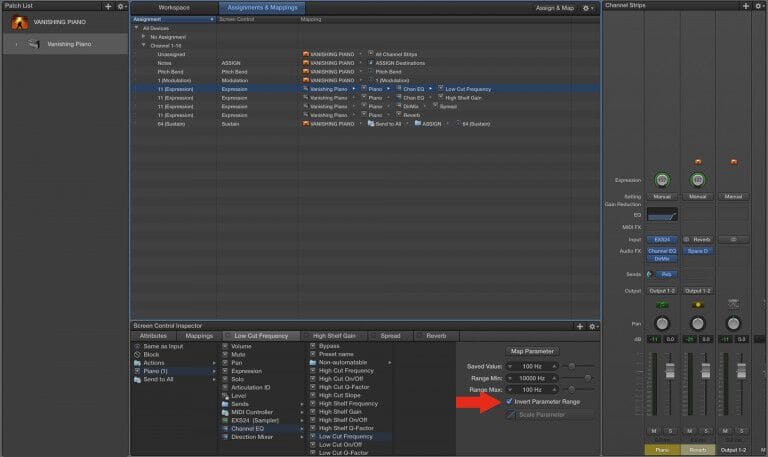
Now, the mapped effect parameters should default when the expression pedal is at 127, and maximize when the pedal is at 0.
The mapping process is fairly easy. The artistic side — deciding which effects to use and transform, is the challenging part. Knowing where in the signal chain to place effects plugins is also an art in itself. I recommend studying up on basic music production concepts if you’re interested in integrating effects into your MainStage programming. Here are a few general guidelines and tips.
- In most cases, EQ should come after compression (or any other plugin that is triggered at a certain volume level). Why? Read this.
- Use buses and sends for “global effects,” For me, the term refers to reverbs and delays. Use inserts for other effects plugins.
- Learn the difference between pre-fader and post-fader sends. I used a pre-fader send for the reverb because I didn’t want the piano fader movement to affect the signal level being sent to the reverb bus.
- Always experiment with automating different effect parameters.