By this point, you should have a good understand of how MainStage operates. We started off by giving you an introduction to digital audio and how it relates to MainStage. We then discussed how to connect your gear to MainStage. After that, you learned about the hierarchy of a MainStage concert and virtual instrument and effects plugins. In this chapter, we’ll start off with a brief discussion of keyboard programming standards, followed by a number of detailed examples.
Preparing a MainStage Concert
Here are a few things you should double check before the programming process.
- Make sure all your controllers are assigned correctly in Layout Mode and in Assignments & Mappings.
- Remove any unneeded channel strips and effects (MainStage’s default layouts usually have channel strips for reverbs and delays).
- After preparing a concert, you may want to consider saving it as a template for future use.
Mapping the Expression Pedal
By default, the expression pedal controls the expression dial which can be seen at the top of every channel strip. While this does technically allow you to control volume, it’s not the best way to do it. Depending on your settings, the dials may not reset to 127 after a patch change.
This can lead to volume balancing issues between patches and other things you don’t want to deal with. The solution to this is to map the expression to control Output 1 – 2 (master volume) with a range of -infinite dB to 0 dB, and disable the expression dial control.

View your Assignments & Mappings in Edit Mode, and you should see something like this. In our example screenshot, the expression pedal’s screen control is named “Expression Pedal,” and it’s currently mapped to 11 (Expression). 11 is the MIDI continuous controller (CC) number for expression.
To change the mapping, click on the Expression Pedal row. You should now see a menu like the one below in the Screen Control Inspector at the bottom of your screen.
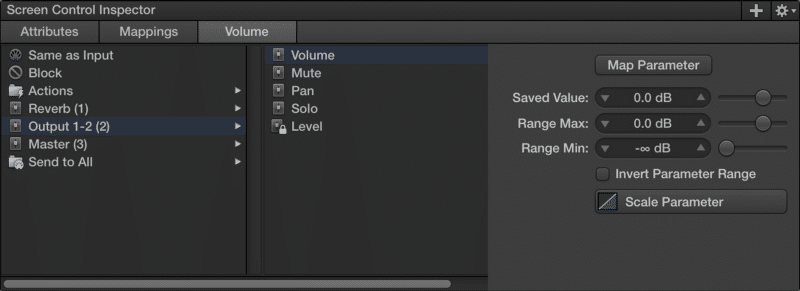
By default, the expression pedal is mapped to Same as Input. The mapping that we’re after is Volume inside the Output 1 – 2 folder. By default, the value for Ranged Max is +6.0 dB, so make sure you change that to 0.0 dB. If you mapped everything correctly, you should see your Output 1 – 2 volume fader move with the expression pedal. If you’re running a MainStage concert with multiple outputs, you can map the expression pedal to control the volume for all outputs in this menu.
Filtering Out Unused Controllers
MainStage’s channel strips respond to standard controllers including pitch bend, sustain, modulation, expression, and aftertouch. In the Channel Strip Inspector for instrument channel strips and external instrument channel strips, it’s possible to filter out unneeded controllers.
Think of how many patches in a typical show actually require pitch bend, modulation, and aftertouch — probably less than 10. Just because a patch doesn’t require modulation doesn’t mean it won’t respond to mod wheel movement. Thus, it’s best to filter out unneeded controllers. It ensures channel strips won’t be affected by accidental controller movement.
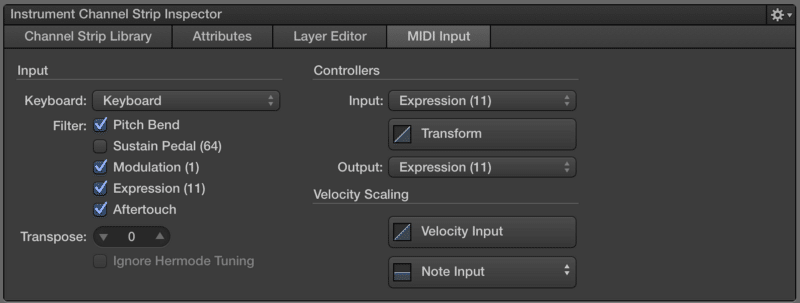
For most channel strips, you should filter out pitch bend, modulation, and aftertouch. If a sound, such as B-3 organ or a synth lead, requires the mod wheel or pitch bend, don’t filter those controllers for that specific channel strip. Expression should always be filtered out because volume control is already mapped to Output 1 – 2.
Creating a Sounds Folder
Creating a sounds folder can be a huge timesaver, and here’s why.
- Many keyboard books re-use the same sounds, so you’ll have quick access to all your sounds.
- You won’t have to go hunting through a concert to find a specific sound to copy and paste.
- Aliasing from the sounds folder reduces CPU and RAM usage, and makes organization easier.
There are a few ways to create a sounds folder. We typically create a set at the end of the concert, and organize it in two different ways depending on how many sounds are needed for the show.
- For shows with a lot of sounds, we create a patch for each instrument family with channel strips for all the different sounds. For example, a Strings patch may contain Strings, Marcato Strings, Tremolo Strings, etc. A Brass patch may contain Full Brass, Trumpet, French Horn Section, etc.
- For shows with less sounds, we create a patch for each sound. For example. the sounds folder may contain patches for Piano, Rhodes, Wurlitzer, etc.
Both methods have their pros and cons, and which one to choose completely depends on the scope of your project and your own personal workflow. In either case, creating a sounds folder is definitely a good idea.
Splits & Layers
Splits and layers refer to the specific sounds mapped to specific areas of the keyboard. In MainStage, channel strips can be split and layered across the keyboard to form patches. Take a look at these three screenshots demonstrating splits and layers.
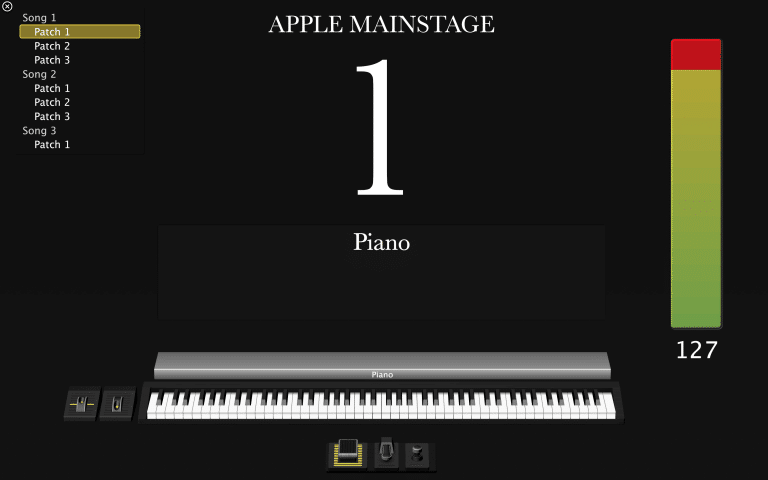
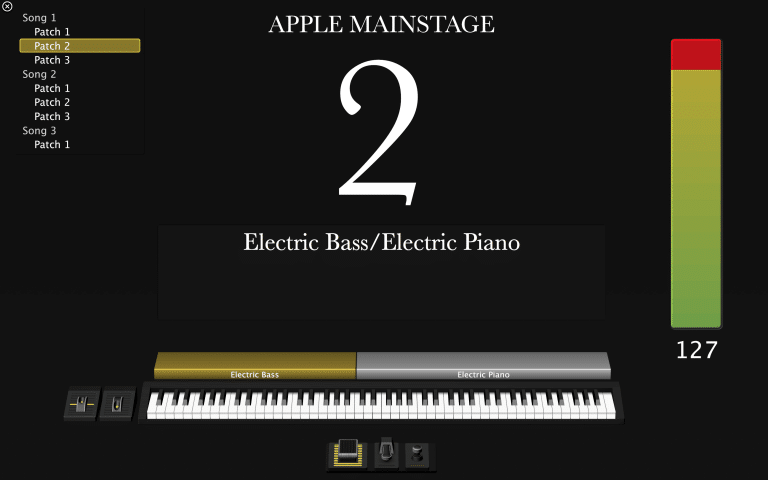
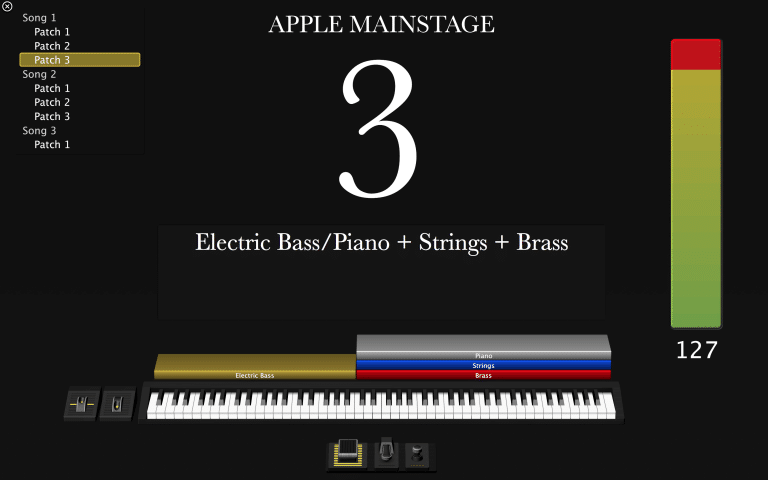
In #1, a piano takes up the whole keyboard. In #2, an electric bass and electric piano are split at Middle C. In #3, an electric bass occupies everything under Middle C, while piano, strings, and brass are layered above.
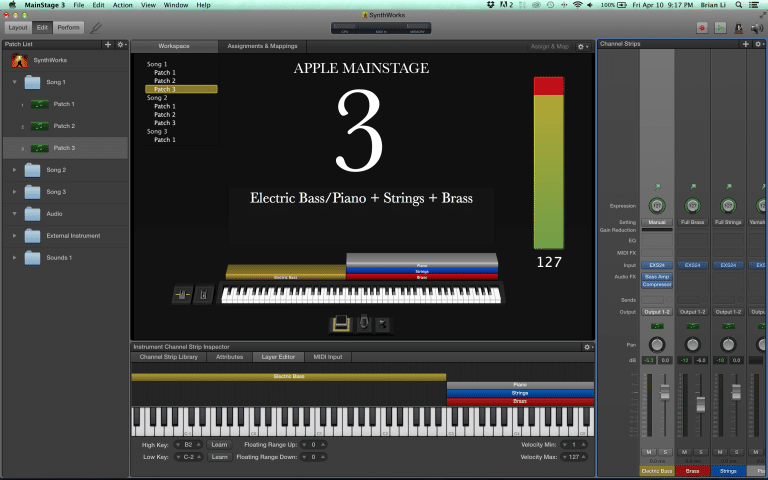
To change a channel strip’s note range, just click on Layer Editor in the Instrument Channel Strip Inspector. Here’s a screenshot showing exactly what the Layer Editor looks like.
There are three ways to change a channel strip’s note range.
- Click and drag the colored layers.
- Input the desired High Key and** Low Key**
- Click on Learn, and play the desired note on a MIDI controller.
Velocity Ranges & Scaling
Splits and layers let you map channel strips to certain note ranges. What if you want to map a channel strip to a certain velocity range, and when would this be useful? Here are a few hypothetical situations…
- A timpani should sound only when playing fortissimo.
- Legato strings at low velocities, and marcato strings at high velocities.
The velocity range for each channel strip can easily be changed via the Velocity Min and** Velocity Max** controls to the left of the Layer Editor. By default, the minimum velocity is 1 and the maximum velocity is 127.
- To accomplish Scenario #1, Velocity Min can be set at 110 for a timpani channel strip.
- To accomplish Scenario #2, the velocity range for Legato Strings could be set to 1 – 109, and the velocity range for Marcato Strings could be set to 110 – 127.
MainStage also has a handy velocity scaling feature. In Scenario #1, the timpani is sounds because it’s being played with force. What if you want the timpani to sound a softer velocity while playing with force? The answer is MainStage’s velocity scaling feature, which takes your input velocity and modifies it according to your settings before sending it further down the signal chain.
The velocity scaling menu can be found in the MIDI Input tab of the Instrument Channel Strip Inspector under Velocity Scaling. There are two types of velocity scaling.
- Velocity Input affects all notes on the keyboard equally.
- Note Input lets you set velocity offsets for each individually note on a keyboard.
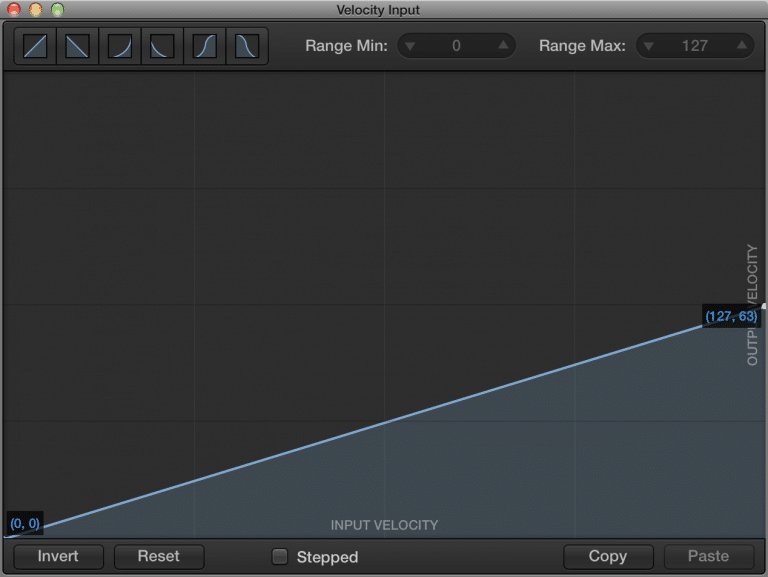
In most cases, you’ll want to use the Velocity Input method. The X-Axis (horizontal) represents input velocity, and the Y-Axis (vertical) represents output velocity.
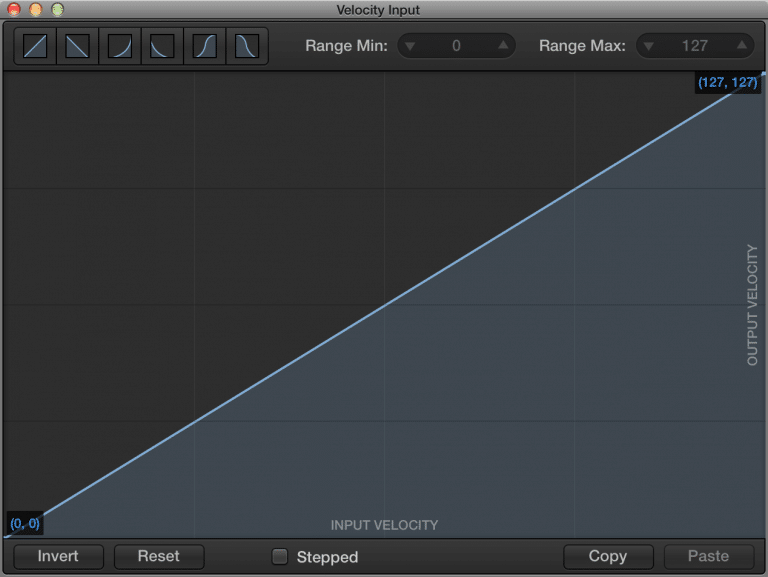

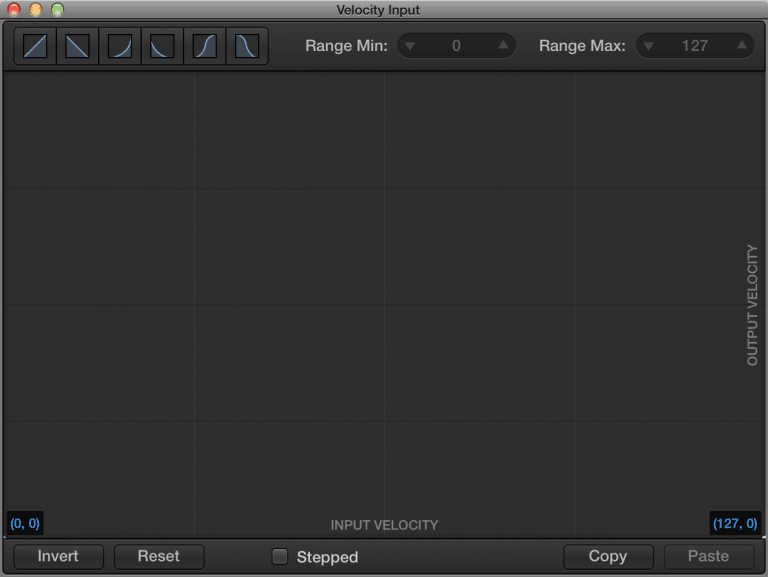
- Screenshot #1 shows the default velocity curve.
- Screenshot #2 shows a less steep curve, and can be used to accomplish our timpani scenario. When the input velocity equals 127, the output velocity equals 63. In other words, playing the keyboard with force will always yield a proportionately softer sound.
- Screenshot #3 shows a straight line at 127 velocity, meaning no matter how soft you play, a velocity of 127 will always be sent to the virtual instrument.
- Screenshot #4 shows a straight line at 0, meaning no matter how hard you play, a velocity of 0 will always be sent to the virtual instrument resulting in no audible sound.
The examples above are somewhat extreme in nature, but velocity scaling has many practical uses.
- Quick forte string or brass passages can be difficult to play if you’re trying to play every note with force. Increasing the output to input velocity ratio means you can play the passage with less force.
- A timpani’s lower velocity layer can occasionally get lost in a dense mix. By increasing the output to input velocity ratio, the timpani’s higher velocity layers can be accessed without physically playing harder.
Transposing Sounds
Transpositions occur quite frequently in keyboard books, so it’s important to know what to do when you see it. Typically, you’ll see a marking like “sounds 8va” or “sounding 8vb,” Occasionally, you may even see something like this “four octaves up” or “three semitones lower,”
Transposing can be performed on two different hierarchical levels. To transpose an individual instrument in a patch, transpose the channel strip. To transpose** every instrument** in a patch, either transpose all channel strips separately OR transpose the entire patch.

To transpose an individual channel strip, click on the MIDI Input tab of the Instrument Channel Strip Inspector. Next to Transpose, dial in the number of semitones desired. In the screenshot above, we have transposed the channel strip up one octave (12 semitones). The maximum number of semitones that can be transposed is 96.
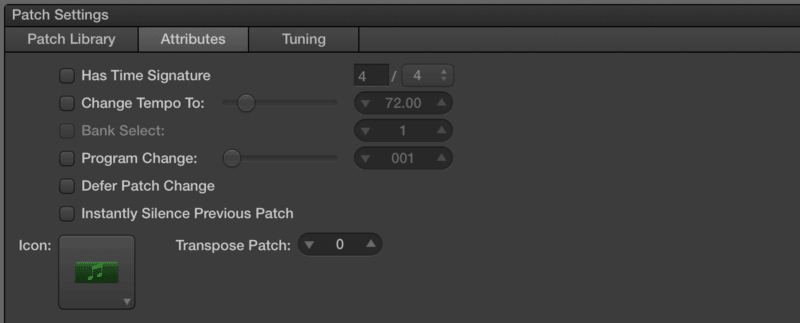
To transpose an entire patch, navigate to the Attributes tab in Patch Settings. Next to Transpose, dial in the number of semitones desired. Remember, this will affect all channel strips in the patch.
Triggering Sound Effects
Triggering sound effects is a common occurrence in keyboard books, so it’s important to know how to do it correctly. We’ll be using the EXS24 sampler to create a custom instrument containing our sound effect. First, let’s go through some basic terminology.
EXS24 is a sampler plugin that works within MainStage. A sampler lets you manipulate audio samples and assign them to specific keys so they can be triggered by a keyboard or some other MIDI controller. In EXS24, samples are assigned to zones. Only one sample can occupy a zone, but a zone can stretch across multiple keys. You can also put any number of zones inside a group, which acts as a folder with its own customizable parameters.
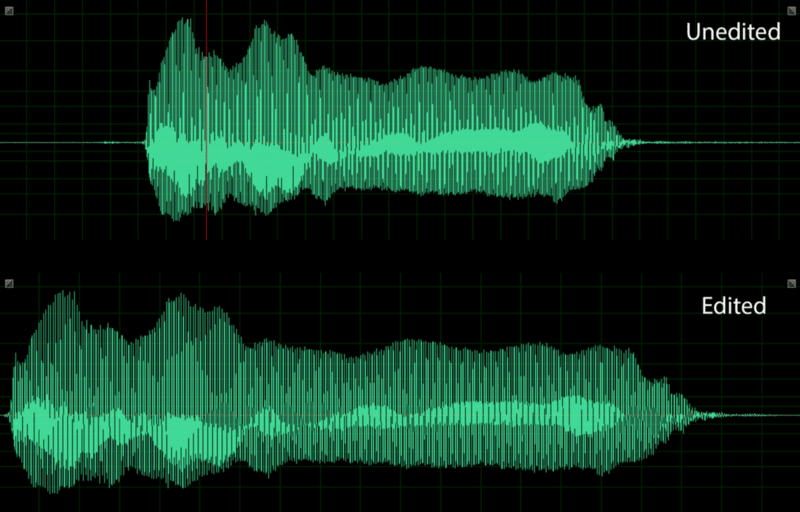
Before continuing on, be sure your sound effect sample meets the following criteria…
- The sample is in 16 bit/44.1 kHz WAV or AIFF format.
- Excess silence before or after the sample has been edited out.
If you don’t have a sound editor, Audacity is a great program and can be downloaded for free. Below is a comparison of an unedited sample and an edited one.
I recommend creating a folder in your user “Sampler Instruments” folder for sound effects. That way, they’ll always be in a safe place. Open Finder, press “Cmd+Shift+G,” and type the following: “~/Music/Audio Music Apps/Sampler Instruments” to navigate to the correct directory.
Now, it’s time to map the sound effect to a key with a custom EXS24 instrument.
- Open up an instance of EXS24, and hit “Edit” to bring up the Instrument Editor window.
- Click on “Zone,” and create a new zone.
- Click on the triangle to the right of “Audio File,” and navigate to the sound effect.
- Under “Playback,” make sure only “1shot” is checked. “Pitch” and “Reverse” should be unchecked. “1shot” plays through the whole audio file without having to hold down the key, “Pitch” pitch corrects audio files, and “Reverse” plays audio files in reverse.
- Save the instrument in the same directory as your sound effect audio file.
- In EXS24’s instrument interface, turn “Level” up to full in the top right corner. This will turn off velocity sensitivity, and your sound effect will always sound at full volume.
- Now you have an EXS24 instrument that triggers your sound effect when any key is pressed. Notice that we didn’t map the sound effect to a specific key range inside EXS24. The better solution is to use MainStage’s Layer Editor to map the instrument to the correct key. This way, you can assign the sound effect to any key without dealing with EXS24’s interface.
Triggering Harp Glisses
Harp glissandi can be triggered multiple ways. The traditional way is to pre-record the harp gliss and trigger it like any other sound effect. This method can be extremely time consuming, especially if you have to change range or tempo at a later time.
Fortunately, we have written a script that generates harp glissandi on the fly with customizable parameters such as note range, tempo, trigger note, and even velocity curve. It’s called Harp Gliss Trigger, and it can be found here along with our other offerings.
Mapping with Chord Trigger
Chord Trigger is a MIDI FX plugin that was introduced with MainStage 3, and it can be used to map anything from basic octaves to complex chords. Chord Trigger operates in two different modes — Single and Multi.
Single Mode applies a mapping to every note in the defined range. Multi Mode lets you apply different mappings to each note in the defined range. Single Mode is very useful for adding octaves, and Multi Mode is useful for mapping more complex passages.
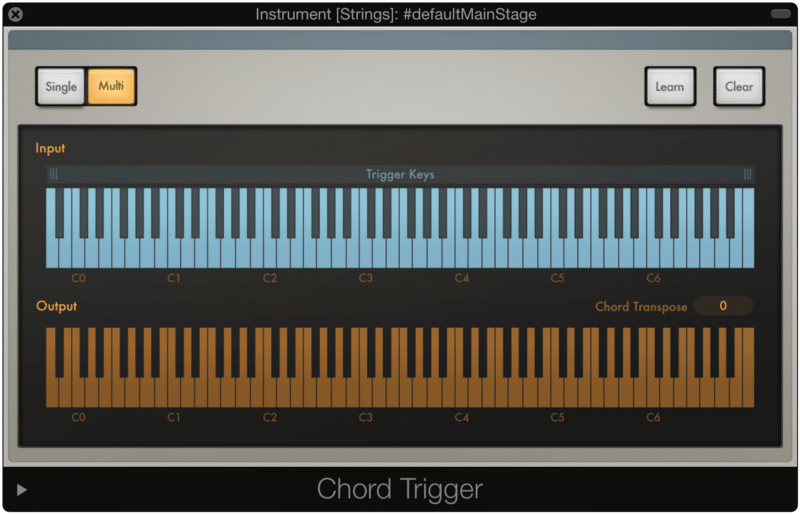
The Chord Trigger plugin can be found in the MIDI FX section of an instrument channel strip. In addition to the mode select buttons, there is a blue keyboard which represents the input, and an orange keyboard which represents the output. The active note range can also be defined using the Trigger Keys slider.
Mapping in Single Mode
It’s common to see markings like +8vb or +8va in keyboard books. Octaves can easily be mapped with Chord Trigger’s Single mode.
- Click on Single Mode
- Click on the Learn button.
- Click on C3 on the blue keyboard.
- Click on C3 and C4 on the orange keyboard.
- Click on Learn again to disengage it.
If you play a note on the keyboard now, you’ll notice a higher octave is automatically added. By default, this mapping applies to the entire range of the keyboard, but you can easily change that using the Trigger Keys slider. To add a lower octave, select C3 and C2 in Step 4 instead of C3 and C4. The same method can also be used for +15mb and +15ma mappings.
Mapping in Multi Mode
Keyboard books from shows like The Lion King and** The 25th Annual Putnam County Spelling Bee** call for more complex mappings than simple octaves. These parts require different mappings on individual notes, which can easily be achieved with Chord Trigger’s Multi mode.
- Click on Multi Mode
- Click on the Learn Button
- Click on C3 on the blue keyboard.
- Click on C3, E3, and G3 on the orange keyboard.
- Click on D3 on the blue keyboard.
- Click on C3, E3, and G3 on the orange keyboard.
- Click on Learn again to disengage it.
If you play C3 and D3, you’ll now hear the same C major chord. If you tried applying the same mapping in Simple Mode, D3 would sound a D major chord instead. Chord Trigger’s Multi Mode is incredibly powerful, and opens up a whole new world of programming possibilities.
This post is part of the Apple MainStage Keyboard Programming series. The next post in this series is *Using Third Party Plugins & Sample Libraries in MainStage *.